日历
Odoo Calendar is a scheduling app that allows users to integrate a company’s business flow into a single management platform. By integrating with the other apps in Odoo’s ecosystem, Calendar allows users to schedule and organize meetings, schedule events, plan employee appraisals, coordinate projects, and more – all from the same platform.
Upon opening the , users have an overview of their current meetings. The selected view option appears as a Day, Week, Month, or Year drop-down menu. Under the view options drop-down menu, users can also enable or disable Show weekends.

小技巧
Depending on the selected view option, users can click the (left or right arrow) buttons to switch between days, weeks, etc., and switch back to the current day with the Today button.
Sync third-party calendars
Users can sync Odoo with existing Outlook and/or Google calendars, by heading to . From here, enter Client ID and Client Secret. There is also an option to pause synchronization by ticking the checkbox, or automating synchronization by keeping it blank.
Once the desired configurations are complete, be sure to click Save before moving on.
Events created in synced calendars automatically appear across the integrated platforms.
Create activities from chatter
Instantly create new meetings anywhere in Odoo through an individual record’s chatter, like in a CRM opportunity card or task in the Projects app.
From the chatter, click on the Activities button. In the Schedule Activity pop-up window, select the desired Activity Type, which populates a set of buttons, depending on the activity.
Activities that involve other schedules, like Meeting or Call for Demo, link to the Calendar app. Select one of these activities to link to the Calendar app, then hit Open Calendar to navigate back to the app. Alternatively, it is also possible to Schedule & Mark as Done to close out the activity, or select Done & Schedule Next to keep the Schedule Activity window open to create another.
Plan an event
To put an event on the calendar, open the , and click into the target date. On the New Event pop-up window that appears, start by adding the event title.

The target date auto-populates in the Start field. This can be changed by clicking into the date section, and selecting a date from the calendar. For multi-day events, select the end date in the second field, then click Apply.
Tick the All Day checkbox if there is no specific start or end time.
For events with specific start and stop times, ensure the All Day checkbox is unticked to enable time selection. With the All Day checkbox unticked, time selections appear in the Start field.
The signed-in user auto-populates as the first attendee. Additional Attendees can be added or created from here, as well.
For virtual meetings, copy and paste the URL into the space provided in the Videocall URL field. Or, click Odoo meeting to create a link.
Next, either create the event by clicking Save & Close, or select More Options to further configure the event.
小技巧
Once the event is created, users can click into the virtual meeting directly from the calendar event to access more configuration options.
The Description field allows users to add additional information and details about the meeting.
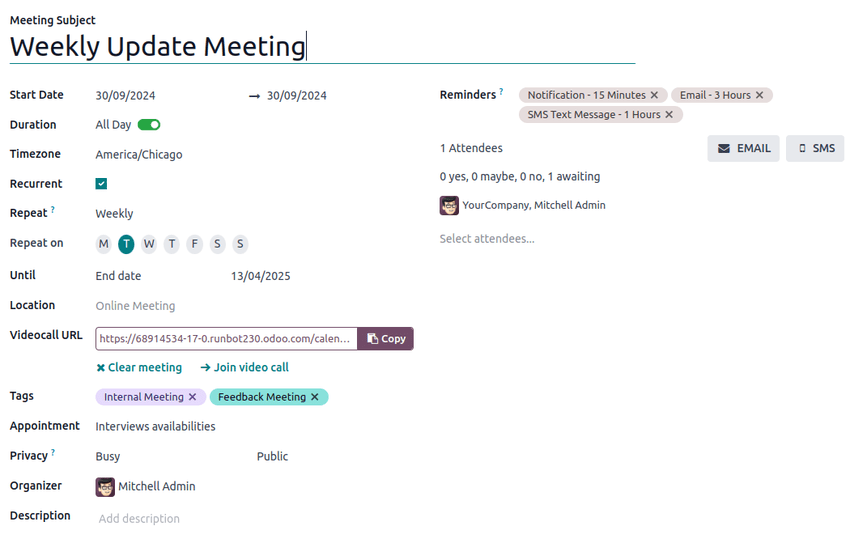
Click More Options to navigate to the meeting form, which provides additional configurations for the event:
Duration: Define the length of the meeting in hours, or toggle the All Day switch.
Recurrent: Tick the checkbox to create a recurring meeting. Once selected, this opens new fields:
Timezone: Select the timezone for which this meeting time is specified.
Repeat: Select the recurring period of this meeting. Depending on what type of recurrence has been selected, a subsequent field appears, in which users can indicate when the meeting should recur. For example, if Monthly is selected as the Repeat option, a new field appears, in which the user decides on what Day of Month the meeting should recur.
Until: Select the limited Number of repetitions this meeting should recur, the End date of when the recurrences should stop, or if the meetings should recur Forever.
Tags: Add tags to the event, like
Customer MeetingorInternal Meeting. These can be searched and filtered in the Calendar app when organizing multiple events.Appointment: Link existing or new appointments. These can be configured through the Share Availabilities button from the main Calendar dashboard.
Privacy: Toggle between visibility options to control who can view the event.
Organizer: This is defaulted to the current Odoo user. Select a new one from existing users, or create and edit a new user.
Description: Add additional information or details about the meeting.
Reminders: Select notification options to send to attendees. Choose a default notification, or configure new reminders.
Coordinate with teams’ availability
When scheduling an event for multiple users, on the Calendar app dashboard, tick the checkbox next to Attendees to view team members’ availability. Tick (or untick) the checkbox next to listed users to show (or hide) individual calendars.

分享可用性
On the Calendar app main dashboard, click the Share Availabilities button at the top of the page. Next, click and drag to select the available times and dates on the calendar to add them as options in the invitation.
小技巧
To remove a selected time range, hover over the availability to click the (trash) icon.
注解
Within the Share Availabilities feature, selecting times is only possible on the Day calendar views.
Once availability has been selected, click the Open button to navigate to the associated appointment.

Several configuration options are available on the appointment form:
In the Scheduling field, set a minimum hour window to ensure appointments are confirmed
a specified amount of time in advance. For example, set 01:00 to require attendees to confirm at
least one hour before their appointment time.
In the Allow Cancelling field, set a maximum hour window before the appointment that attendees are able to cancel.
The Availability on field enables attendees to book Users or Resources, such as meeting rooms or tables. After selecting Users or Resources, type in the desired user or resource in the space below.
The Front-End Display field is used to choose No Picture or Show Pictures related to the selected user or resource on the appointment page.
If Resources has been selected in the Availability on field, users have an option to Manage Capacities.
Tick the checkbox to limit the maximum amount of people that can use the resource at the same time.
The Assignment Method field enables the order in which attendees book their time and user/resource:
Pick User/Resource then Time
Select Time then User/Resource
If Resources has been selected in the Availability On field, a third option is available, Select Time then auto-assign.
Optionally, configure the following tabs:
点击 预览 按钮,查看参与者的预约链接。
配置完成后,点击 分享 按钮生成链接直接发送,或点击 发布 在连接的 Odoo 网站上发布预约选择。
Schedule tab
在预约表单的 时间安排 选项卡中,可以管理时段。目标日期和时间将作为第一个时段弹出。
要添加新的时间段,请点击 添加一行。点击 从 字段下的新空白处,然后分别选择并输入新的目标开始日期和时间。重复 至 下新空白处的操作,选择并输入新的目标结束日期和时间。
“选项”选项卡
选项 选项卡提供其他配置:
网站:指定此会议邀请函将在哪个网站上发布。
时区:默认为在**设置**应用程序中选择的公司时区。要更改时区,请从下拉菜单中选择所需的选项。
位置:从下拉菜单中选择或创建新地点。如果此字段为空,则认为会议是在线进行的。
视频会议链接: 从 Odoo 内部讨论 或 Google 会议 中选择,在会议邀请中包含视频会议链接,或留空以防止生成会议 URL。
手动确认:只有在 可用 字段中选择 资源 时才会显示。勾选复选框,并输入所选资源总容量的最大百分比,以创建手动确认要求,最终确定会议。
预付款:勾选复选框,要求用户在确认预订前付款。勾选后,会出现一个指向 配置支付提供商 的链接,该链接可实现在线支付。
工作时间限制:如果 用户 已在 可用 字段中选择,请勾选复选框,将会议时段限制在所选的 用户的工作时间 中。
创建商机:选择此选项后,每个已安排的预约都会创建一个新的 CRM 机会。
提醒:在此字段中添加或删除通知提醒。在空白处选择其他选项。
确认电子邮件:勾选复选框,以在会议确认后自动向与会者发送确认电子邮件。从电子邮件模板中选择,或点击 搜索更多…,然后点击 新建 创建自定义模板。
取消电子邮件:勾选复选框,以在会议取消时自动向参与者发送取消电子邮件。从电子邮件模板中选择,或点击 搜索更多…,然后点击 新建 创建自定义模板。
抄送至:在此字段中添加接收会议更新通知的联系人,无论其是否参加会议。
允许访客:勾选复选框,允许参与者邀请访客。
问题选项卡
在 问题 选项卡中,添加供参与者在确认会议时回答的问题。点击 添加一行 配置 问题 。然后选择 问题类型,可选择添加 占位符 答案,并选择是否为 必答题。
要了解如何创建更全面的问卷,请访问 调查问卷 应用程序说明文档 创建和配置数据捕获问题。
Messages tab
在 信息 标签的 介绍信息 字段中,添加出现在邀请函上的附加会议信息。
会议确认后,添加到 确认时的附加信息 字段的信息就会出现。