Ordering and checkout
Odoo eCommerce provides several options to organize the ordering and checkout process. It offers different order button options and sequential checkout steps, some of which support additional features. The related buttons and checkout pages can be customized using the website editor.
Add to cart options
Default add to cart behavior
When clicking the Add to cart button, different actions can be triggered. To configure them, go to , scroll down to the Shop - Checkout Process section, and select one of the following options:
Stay on Product Page: The customer remains on the product's page.
Go to cart: The customer is immediately redirected to the cart.
Let the user decide (dialog): The customer can choose if they want to go to the cart (Proceed to Checkout) or if they prefer to stay on the product page (Continue Shopping).
Note
This dialog box always appears regardless of the configuration to suggest optional products, if any.
Button customization
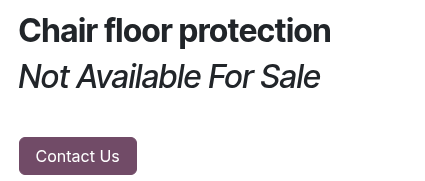
You can replace the Add to Cart button with a Contact Us button, which redirects users to the default contact form.
Note
Removing the ability to add products to the cart is often used by businesses that want to display an online catalog but cannot share prices publicly (e.g., to offer custom or variable pricing).
To do so, go to . Under the Shop - Products section, tick Prevent Sale of Zero Priced Product. A new Button url field appears to enter a redirect URL.
Then, for all products that should display the Contact Us button, set their price to
0 using the product form or a pricelist.
Note
The Contact Us button label, URL, and the Not Available For Sale text beneath the product title and description can be modified on the product's page while in Edit mode.
Buy now
To let customers choose to go to the review order step directly, you can add an additional Buy now button. To do so, go to . Under the Shop - Checkout Process section, tick the Buy Now feature.
Tip
Alternatively, enable the feature by going to any product's page while in Edit mode and, in the Customize tab, clicking the Buy Now button next to the Cart options.

Re-order from portal
You can let customers re-order items from previous sales orders from their customer portal using the Order Again button. To add it, go to . Under the Shop - Checkout Process section, tick the Re-order From Portal feature.

Checkout policy
To allow customers to checkout as guests or force them to sign in/create an account, go to , scroll down to the Shop - Checkout Process section, and configure the Sign in/up at checkout setting. The following options are available:
Optional: Customers can check out as guests and register later via the order confirmation email to track their order.
Disabled (buy as guest): Customers can checkout as guests without creating an account.
Mandatory (no guest checkout): Customers must sign in or create an account at the Review Order step to complete their purchase.
B2B access management
To restrict checkout to selected B2B customers:
Go to , and in the Shop - Checkout Process section, enable the Mandatory (no guest checkout) option.
Scroll down to the Privacy section, go to Customer Account, and select On invitation.
Go to , switch to the List view, and select the customers you wish to grant access to your portal.
Click the Actions button, then Grant portal access.
Review the selected customers in the Portal Access Management pop-up and click Grant Access.
Once done, the relevant customers receive an email confirming their account creation, including instructions on setting a password and activating their account.
Note
You can revoke access or re-invite a customer using the related buttons in the Portal Access Management pop-up.
Users can only have one portal access per email.
Settings are website-specific, so you could set up a B2C website that allows guest checkout and a B2B website with mandatory sign-in.
Checkout steps
During the checkout process, customers are taken through the following steps:
Each step can be customized using the website editor by adding building blocks or opening the Customize tab to enable various checkout options.
Note
Content added through building blocks is specific to each step.
Review order
The Review Order step allows customers to see the items they added to their cart, adjust quantities, or Remove products. Information related to the product prices and taxes applied are also displayed. Customers can then click the Checkout button to continue to the Delivery step.
Open the website editor to enable checkout options such as:
Suggested Accessories: to showcase accessory products;
Promo Code: to allow customers to redeem gift cards or apply discount codes;
Add to Wishlist: To allow signed-in users to remove a product from their cart and add it to their wishlist, go to , scroll to the Shop - Products section, and enable Wishlists. The Add to Wishlist option is then enabled by default in the website editor.
Note
If a fiscal position is detected automatically, the product tax is determined based on the customer's IP address.
If the installed payment provider supports express checkout, a dedicated button is displayed, allowing customers to go straight from the cart to the confirmation page without filling out the contact form.
การจัดส่ง
Once they have reviewed their order:
Unsigned-in customers are prompted to Sign in or enter their Email address, along with their delivery address and phone details;
Signed-in customers can select the appropriate Delivery address.
They can then choose a delivery method, select or enter their Billing Address (or toggle the Same as delivery address switch if the billing and delivery addresses are identical), and click Confirm to proceed to the next step.
Tip
For B2B customers, you can also enable optional VAT and Company name fields by toggling the Show B2B Fields option in the website editor.
You can add a checkbox for users without an account to sign up for a newsletter. To do so, go to . Under the Shop - Checkout Process section, enable the Newsletter feature and select a Newsletter List.
ข้อมูลเสริม
You can add an Extra Info step in the checkout process to collect additional customer information through an online form, which is then included in the sales order. To do so, enable the Extra Step option in the website editor. The form can be customized as needed.
Tip
Alternatively, go to , scroll to the Shop - Checkout Process section, enable Extra Step During Checkout, and click Save. Click Configure Form to customize it.
การชำระเงิน
At the Payment step, customers Choose a payment method, enter their payment details, and click Pay now.
You can require customers to agree to your terms and conditions before payment. To enable this option, go to the website editor and toggle the Accept Terms & Conditions feature.
Tip
Enable the developer mode and click the (bug) icon to display an availability report for payment providers and payment methods, which helps diagnose potential availability issues on the payment form.
Order confirmation
The final step of the checkout process is the Order confirmation, which provides a summary of the customer's purchase details.
See also